This project is no longer maintained, and although the software works and it’s an awesome tool, some instructions below may be out of date. The nice thing about open source is you can easily take this project over and make it into anything you like!
You can download the thing here at your own risk
Download “aldl-io Source Code”
aldl-io-1.6.2.tar.gz – Downloaded 1908 times – 268.06 KBContents
Overview
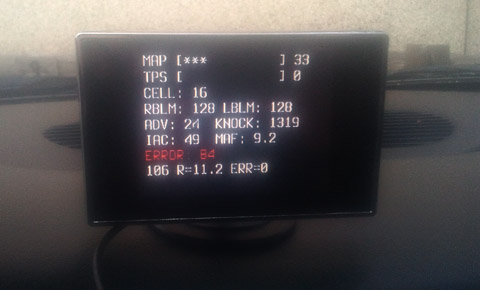
Inspired by some of the low-cost datastream display technologies available for OBD-II systems, I’ve manged to peice together a system for OBD-I vehicles based on the low cost Raspberry Pi ARM computer and a low-cost ‘reverse camera’ screen.
The total price of all the necessary parts to build this system is generally under $100. The screen is optional, and it can also carry out ‘black-box’ unattended logging if desired.

As the target device runs a fully loaded version of Debian GNU/Linux, it becomes not only a tuner’s best friend, but a fully capable car computer.
- Very low power consumption
- Configurable char-based graphical display of engine parameters
- Support for coaxial and HDMI displays
- Automatic (optional) full-time datalogging
- Offline datalog analysis, with automatic BLM and Knock analyzer
- Supports nearly any USB device for almost endless added functionality
- Onboard GPIO header to extend functionality to actuators, etc
- Written in pure C, designed to be easy to modify or improve
- Very simple module api with no knowledge of the datastream necessary
- Incredibly stable connection with very few dropped or corrupted packets
- Optimized throughput for fairly responsive display
Although out-of-the-box configured specifically for the 1994-1995 LT1, it has been written from the ground up to be easily adapted to any 8192 baud GM ECM with fairly simple configuration files.
I’d reccommend at least beginner level unix/linux knowledge before attempting installation of the software at this time.
Required Components
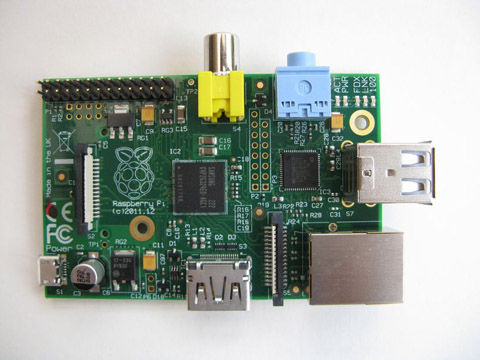
Raspberry Pi

This is a great little low powered credit-card sized computer. They’re very cheap.
When ordering, make sure you are recieving a ‘Rev-B’ board. This updated board has less problematic usb ports, as well as mounting holes for making a custom case.
You will have to google around to find a local retailer for them.
There are accessories such as cases available as well, which you should consider when ordering, as you will likely want a way to mount the device.
I’ll leave that part up to your imagination…
Power Supply
The raspberry pi requires a stable 5 volt power supply with about 1 amp of capacity. Since this will be mounted in a car, you will need a linear or good quality switch mode 12 to 5v supply.
Fortunately, that’s very easy to find these days.. simply buy an automotive USB cell phone charger that is rated at higher than 1 amp, if you shop around you can get a decent one for around $10.
You will also require a micro usb to normal usb cable, if you have owned an android phone, you likely have a spare sitting around. If any high-powered usb devices are required (large wireless adaptors, etc), two GPIO pin jumpers are required (or better yet, an old pc speaker connector as a pigtail works perfectly…)
Screen
Any VGA or HDMI screen will do, but the small 4×3 VGA “reverse camera” systems available on sites like amazon or ebay will do the trick without costing a fortune.
You do get what you pay for, but you can always crank the font size up if the picture quality is poor…
I payed less than $20 for mine on amazon, and it’s just fine.
Cable
The aldl-io software requires an FTDI chipset USB->ALDL interface. The cables sold on sites such as aldlcables.com, among others, will suffice.
If you have a usb to aldl cable already, it is most likely FTDI. You can read the owners manual or contact the manufacturer to find out.
A more generic serial driver is in the works that will allow other types of cables to be used, but I’m not motivated to finish it, so don’t hold your breath.
Software
You will need to download a copy of raspbian-wheezy (or later) from the raspberry pi website. A peice of software called NOOBS is available there to help you get it onto a flash card. The image is large, you should likely download it and place it on a flash card while waiting for your raspberry pi in the mail.
You will also have to download a copy of aldl-io, however if you plug the raspberry pi into your home ethernet network while preparing it, it’s perfectly capable of downloading it.
THIS SOFTWARE WORKS WELL, BUT IS STILL IN ITS EARLY STAGES. I USE IT DAILY, BUT USE AT YOUR OWN RISK
The SD card used should be at least 4GB, or 16GB if you are planning to use this device to datalog. Alternatively, you could log to a usb flash drive that you remove from your car when you wish to review the logs.
Basic Connections
This is a no-brainer, for a basic installation, plugging in power, your screen, and your serial adaptor should be enough.
Now for a word on USB Power. The raspberry pi itself draws a very small amount of power, but it has a built in thermal fuse on the power input.
The revision B board (you did get a rev-b like I told you to, right?) doesn’t have any fuses on the USB ports. That means you can power whatever you like, as long as the thermal fuse on power input is a non-issue.
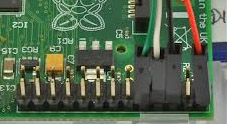
So, to run high powered devices such as wireless adaptors, it will be necessary to power the raspberry pi through the GPIO header to avoid that input polyfuse. If wired this way, the pi is capable of sustaining power for nearly any usb device you can throw at it. Hacking up your usb cable to get a direct connection would work. Remember this is unfused, don’t screw up the polarity!!
I would reccommend connecting the pi this way for maximum reliability anyway. With a Rev-A board, jumpering the polyfuses on the usb ports is an option, but outside the scope of this tutorial.
Just power it up where the black and red wires are in this picture and ignore the others… as mentioned earlier, the PC SPKR jumper connector from an abandoned computer is perfect.

Be sure to mount the raspberry pi somewhere safe and dry, with enough ventilation.
Software Install
First, grab yourself the raspbian operating system and flash it to the card. This is well documented on the raspberry pi website, and these devices are designed for beginners. Boot it up on the bench, and play with it. You can plug it into your television and a usb keyboard for now, to get it set up.
Make sure it’s working correctly. Run the routines for enlarging the main partition, setting a root password, and creating a user. Read some tutorials, and have some fun. Linux is great.
Building and installing aldl-io
Ensure you are connected to the internet:
ping -c1 fbodytech.com
Now, log in as root (your prompt will end with a #) and we’ll walk through the necessary steps to get it working in total noob mode. Normally I am against running as root if not completely necessary, but this operating system is a throw-away at this point, so who cares.
Enter root’s home directory, and download the source code for aldl-io. You will be compiling this yourself… (don’t worry, it’s automated).
cd ~
wget http://fbodytech.com/files/aldl-io-1.6.tar.gz
Extract the tarball, and enter the directory.
tar zxf aldl-io-1.6.tar.gz
cd aldl-io-1.6
Now, there are some required peices of software. We’ll install them before going any further.
apt-get install ncurses-dev libftdi-dev
Linux has its own FTDI driver built into the kernel. aldl-io uses raw usb via a userland interface. We must blacklist and unload that driver:
echo 'blacklist ftdi_sio' > /etc/modprobe.d/ftdi.conf
rmmod ftdi_sio
Now we can build it, and install it in one shot. This will also create a configuration directory in /etc/aldl, and install some default configurations.
make install
Read over the notes briefly to ensure that the installation went alright.
That’s pretty much it, it should run as-is.
Make a link to the log directory
Make a nice convenient link to the log directory, so you can access your logs more easily:
ln -s /var/log/aldl /datalogs
You can easily change the logging directory, auto date-stamp logs, or change many other datalogging settings in the config files.
Test the installation, emulated
The aldl-io package includes a very stupid emulator of an LT1, that simply responds to handshake requests and sends out random (but technically valid) data for testing.
It was compiled and installed automatically, and functions as a fake serial driver, so no ftdi device is necessary to test the software.
Fire it up and get the default console display, and create a datalog of the random data:
/usr/local/bin/aldl-dummy
It should “connect” and start querying data. When you’re done staring at the flashing stuff, press ctrl-c. Always remember this fake ECM exists. It’s great for testing configurations.
Configuration
The Editor
If you aren’t used to a linux-based system, you will need to learn to use one of the included editors. I would reccommend nano, it’s very simple. Open a test file in nano, and learn to edit and save it.
nano /tmp/testfile.txt
Check out your FTDI cable
Plug the FTDI cable into your raspberry pi. Wait a few seconds, then:
lsusb
You should get a list of all of your usb devices. Look for the ID string of your FTDI device. If it’s 0403:6001 (which is the most common), no adjustment is required. Otherwise, write it down so you can edit it in the config file.
Move to the config directory
Enter the config directory, and view the configuration files available.
cd /etc/aldl/ ; ls
Here is a brief overview of what the various config files do:
- aldl.conf – the main configuration file, with options for data acqusition rate, device configuration, and what modules are started by default.
- analyzer.conf – the offline analyzer configuration
- consoleif.conf – configures the layout of the main display
- datalogger.conf – configures the automatic datalogger
- lt1.conf – datastream definition for the LT1. read it to get the names of the various readouts, etc.
Look at aldl.conf first, especially if your device string has changed.
nano aldl.conf
The configuration format is special. To specify a parameter and its value, it must simply have an equals sign directly between the value and parameter. Anything not directly adjacent to an equals sign is ignored.
The software has many strong defaults, but beware, misspelling the name of a parameter will cause it to be ignored, and the default will be set without warning.
If you break a configuration file, the originals are in the examples/ directory of the source code.
I’ll leave the rest to you, I’ve made the config files fairly easy to understand. Use aldl-dummy as a test after you make a change, to ensure that things are working correctly.
Automatic Operation
As this software was designed with a ‘black box’ datalogger in mind, once it’s running, it aggressively tries to maintain a connnection. There are no buttons to press if the datastream is interrupted. When powered up and connected to a vehicle, it should ‘just work’.
If you are using this software with no input device (which you probably are), you should configure it to start automatically on its own virtual console, with no login credentials required.
Edit the inittab file (be careful, if you screw this up, your system will no longer boot!)
nano /etc/inittab
